Posts

Showing posts with the label how to

How to Create Hyperlink on Blogger Header

Image
Today, I got this question in comment of my previous tutorial on How to Create Hyperlink on Blogger Post . Barbara Fowlds L.Ac. : "Can I put a hyperlink in my header of my blogspot blog and if so how?" My answer is Yes you can. And here's how to do it in the simplest newbie way. Before that, I assume you may wanted to add this hyperlink on your Blogger Header Description because maybe you want to invite your visitor to your business website or any other sites you have. For example, I may like to invite my blog reader to read my art blog at http://artofapogee.blogspot.com and my blog description says something like this: Feel free to visit Art Of ApOgEE Blog to see my arts and order some graphic design books And now we wanna link that blue "Art Of ApOgEE Blog" to http://artofapogee.blogspot.com This is the simplest way. You just have to copy paste and no coding . Here's the step: Open up New Post on you blogger, select Edit Html and type the words there: Se...

Finch - Howto use Pidgin via Terminal Console

Image
For those who have starts getting in love with Terminal Console in Ubuntu , you may love to be able to do everything from the Terminal console. Even if I previously said, I've already bored with the terminal coz I see it every day... it is good to know that actually, your terminal can do almost everything you wanna do in your linux box. I just don't like the way it looks and feel because I love art and graphics . I like the eye catchy graphics and also the live cubic desktop effect and so on. Anyway, I would like to share on how to use your Pidgin from terminal console. I have a lot to say about situations where you only got your terminal console to use programs in linux. But lets keep it short and go straight to the point now. The program to enable you to use Pidgin via Terminal console is called Finch . Finch as in the manual is "A Pimpin’ Penguin console frontend to libpurple Instant Messaging client." Run this command on your terminal to install finch in Ubun...

Howto Set Ubuntu Server IP

Image
Configuring Ubuntu Server IP have never been any easier. Just edit the /etc/network/interfaces file using any text editor on the server. By default, you should have nano and vi in your Ubuntu Server. The simplest and straight forward text editor is nano. So, use this command: $ sudo nano /etc/network/interfaces you should see the default file content like this: # This file describes the network interfaces available on your system # and how to activate them. For more information, see interfaces(5). # The loopback network interface auto lo iface lo inet loopback # The primary network interface auto eth0 iface eth0 inet dhcp This is the default network settings on your Ubuntu Server where it use DHCP. So, to set it as static IP. Let say, we wanna setting like this: => Host IP address: 10.1.1.100 => Netmask: 255.255.255.0 => Network ID: 10.1.1.0 => Broadcast IP: 10.1.1.255 => Gateway/Router IP: 10.1.1.254 => DNS Server: 10.1.1.254 You should change the file like th...

Fixing Read More link appear on Blogger Fullpost

Image
Thanks to Paul Escolar who really use my code on 'How to create expandable post summaries in Blogger' and spot a bug on that tutorial. Hence my code for this blog is already changed for other additional stuff. Sorry for that silly mistakes . As I went to debug my tutorial, I found that whoever follow that tutorial properly will get the same result as Paul's blog. So, here is the explanation and how to fix it. Please check at the last chunk of code on 'Step #1 - Edit your template code' . The old code should look like this: <b:if cond='data:post.labels'> <b:loop values='data:post.labels' var='label'> <b:if cond='data:label.name == &quot;more&quot;'> <a expr:href='data:post.url'>...<b>Read more</b></a> </b:if> </b:loop> </b:if> where the previous screenshot is this: What this code do is checking the 'more' label and put that ...

How to create expandable post summaries in Blogger

Image
I've been tweaking my blog template because I've already bored with my old default template that I use previously. While working on this template, I'm thinking that it may be cool to have my long post to be truncated and have the "read more" link . I found the code from Blogger Help to do this. However, there is one issue with their code where the "read more" link will appear regardless of whether a post has been truncated or not. You can check it out at help.blogger.com on How can I create expandable post summaries? . If you have already read them, you should notice the disadvantages under the Note list which says: Disadvantages: Requires changes to the posts themselves, rather than to the template only. However, the "read more" link is in the template, so it will appear regardless of whether a post has been truncated or not. (Modifying this feature is left as an exercise for the reader.) Do you think it is a good exercise? So, how many of...

How to Install .rpm packages in Ubuntu

Image
Ubuntu normally use .deb package for application installer. However, if you have an rpm file for a package you wish to install, and if you cannot find a .deb debian package in any of the Ubuntu repositories or elsewhere, you can use the alien package converter application to install the .rpm file. Alien is a program that converts between the rpm, dpkg, stampede slp, and slackware tgz file formats. If you want to use a package from another distribution than the one you have installed on your system, you can use alien to convert it to your preferred package format and install it. Despite the large version number, alien is still (and will probably always be) rather experimental software. It has been used by many people for many years, but there are still many bugs and limitations. Alien should not be used to replace important system packages, like sysvinit, shared libraries, or other things that are essential for the functioning of your system. Many of these packages are set up different...

Howto Create .ISO images from CD or DVD in Linux

Image
In Linux computer , we have a simple tool to create CD or DVD .ISO file. This is very helpfull to backup your CD and DVD into ISO images: To make an ISO from your CD/DVD, place the media in your drive but do not mount it. If it automounts, unmount it. for dvd: $ dd if=/dev/dvd of=mydvd.iso for cdrom: $ dd if=/dev/cdrom of=mycd.iso for scsi cdrom: $ dd if=/dev/scd0 of=mycd.iso And if you wanna make an ISO from files on your hard drive, create a directory which holds the files you want. Then use the mkisofs command. mkisofs -o /tmp/mycd.iso /tmp/directory/ This results in a file called cd.iso in folder /tmp which contains all the files and directories in /tmp/directory/. For more info, see the man pages for mkisofs, losetup, and dd, or see the CD-Writing-HOWTO at http://www.tldp.org. Enjoy Linux!!

How to build your own low cost superb wifi booster.

Image
Wireless have been widely used in houses and offices. I'm also using the Linksys WRT54G in my house to allow me to access internet where ever I am in my house. Whether I'm in the living room, on my study room or even at my balcony. However, as my house have 2 floor, I found some spots where the signal is so weak... So, I'm searching on how to boost up the signal without having to buy new Access Point. Then I found this cheap hack to boost my wireless signal . It is a Parabolic Wifi Booster. I believe this hacks works well as it have many versions and have been widely used by others... You can have a look at this Ez-12 Parabolic Reflector Template that use the same technique. Anyway, I'm gonna try it myself and will post the result soon...

How to Create Hyperlink on Blogger Post

Image
Well, this time I make a basic simple tutorial. For all advanced geek who read this blog, please ignore this post... I just wanna help myself not to teach the same basic thing on every newbies friends that really need help. OK guys, back to the howto... There are two ways to create a hyperlink on your blog post. One is the simple GUI way and the other is coders way. I prefer the coder way as I can have more control on it. I like to teach by example. So, let say you wanna create a hyperlink on this line of words... You can go here to see my art blog where you wanna link the word "here" to the other page on your blog or on the internet. In this example, I wanna link it to my Art Of Apogee Blog post with the address: http://artofapogee.blogspot.com/2008/03/gimp-best-free-photoshop.html And here is how to do it using both ways... The simple GUI way If you rollover every button on your Compose toolbar, you can see one button called "Link" where the word Link will pop u...

Installing rar and unrar programs in Linux or Unix

Image
I recently notice that I got some visitors bump in this coder's talk blog , searching for How to create and extract rar files in linux and I do remember that I didn't put on how to install rar and unrar program in other distributions of linux. I'm so sorry, my mistake. However, I am a linux supporter and I don't want to make you upset while bumping into this blog and didn't really get what you need. So, here is how to install rar and unrar on other linux distributions... Under Debian Linux, you can use the same apt-get method as follows to install unrar program: $ apt-get install unrar If you are using Fedora core Linux then use yum command as follows: $ yum install unrar If you are using FreeBSD, you can use: $ pkg_add -v -r unrar If any of above, methods is not working, you can download binary package from official rarlab site and choose the right package for your machine... for example, i chose the latest (by the time i write this post): $ cd /tmp $ wget http:/...

How to get Windows XP command prompt output to Notepad

Image
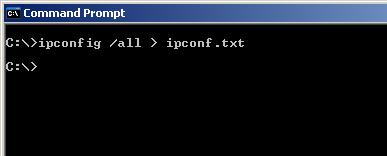
Sometimes we need to copy output from a command prompt and paste it into a Windows program such as Notepad. Usually, you’ll try to use the Mark and Copy commands on the command prompt’s Edit menu. I recently found an article from Tech Republic about Copy and paste from Windows XP Pro’s command prompt straight to the Clipboard where Greg Shultz is introducing a command line tool called Clip.exe. But I have my own way to get information from a command prompt and onto your notepad without using the Clip.exe. It is so simple. Lets say, you want to get the output from ipconfig command, then just add a '>' and type the name of text file you want like 'ipconf.txt'. On the command prompt it will look like this: Then, you can view your output on notepad by simply type 'notepad ipconf.txt' and press enter like this: That's all. Good Luck and have fun! Anyway, you may want to view Greg Shultz's tips on how to Copy and paste from Windows XP Pro’s command promp...

How to burn bin & cue file to DVD

Image
I've been playing around with Torrent downloads few weeks ago and encounter this problem to burn a bin & cue files that I've downloaded. Seems stupid right? I suppose to have it done perfectly in Nero but then the problem appears and it took me hours to think about this simple solution. The Problem Let me list my problem on burning this bin and cue files using Nero. The bin file size is larger than maximum CD-R size. It is about 2.9GB Every time I load the cue file through the Burn Image menu in Nero, it will automatically set it to burn on a CD-R. How stupid is this? I can't find ways to change the target media to burn it to DVD from the automatically set CD-R media. Am I stupid then? The Solution After struggling with Nero and everything I got in my PC, then I've come out with this simple and easy solution to solve the problem. Actually, I have Virtual DEAMON installed in my PC. For those who don't know about the software, it works as my virtual drive where I...

How to Flip Your Visual Basic Form in another Form

Image
I recently joined myLot forum . It is a paid to post forum introduced by my friend. Hah! Hah! I'm thinking about making money while hanging around the net with friends. Isn't that great? You can get money if you start a good discussion and even get money when responding in discussion in a good manners. The good thing is myLot can pay me via PayPal or e-Gold. So, if you are interested too, then you can simply join the myLot forum for free by clicking here and then click on sign up. Ups, back to the topic. While browsing the forum, I found a Visual Basic question about how to flip the content of the VB form . So, I decided to help him and make this simple step by step code. OK lets make it simple because I also hate to type a lot . We are using VB6 to create this small project. So, make sure you have VB6 installed to follow this steps. Step 1: Open up VB6 and create new project using 'Standard EXE' . Step 2: Add one CommandButton (we will use this to trigger the f...